> ## Documentation Index
> Fetch the complete documentation index at: https://docs.visitoai.com/llms.txt
> Use this file to discover all available pages before exploring further.
# Use Visito with Codex and Claude
> Connect your Visito business, choose permissions, analyze conversations, and send a controlled test reply from Codex or Claude.
Connect Codex or Claude to Visito to work with your business in natural language. You can read conversations, identify common questions, and perform the operations you authorize.
This guide uses a **custom remote MCP connection**. MCP is the connection that gives your assistant access to Visito tools. A packaged plugin can also include operating instructions, but it is not required for this setup. Visito's public plugin-store installation is not part of this guide.
## Before you start
* Have an active Visito administrator account for the business you want to connect.
* Use Codex with remote MCP support, or Claude with access to custom connectors. A managed Claude workspace may require its owner to add the connector first.
* For a messaging test, use a contact and channel you are authorized to message. Reading conversations does not require sending permission.
Use this server address in either assistant:
```text theme={null}
https://platform-api.visitoai.com/m2m/v1/mcp
```
Sign in on Visito's website when prompted. Do not paste your Visito password, API key, or OAuth callback URL into an assistant conversation.
## 1. Add Visito
### Ask Codex to help
Paste this into Codex:
```text theme={null}
Add a remote MCP server named visito with this URL:
https://platform-api.visitoai.com/m2m/v1/mcp
Use OAuth sign-in and guide me through connecting my Visito business.
Open Visito's sign-in page so I can choose my business and permissions.
```
Codex can help configure the server when its environment allows it. You still complete Visito sign-in and choose the permissions in the browser. If configuration is unavailable from the conversation, use the manual method below.
### Add it manually
In the desktop app, open **Settings → MCP servers → Add server**. Name it `visito`, choose **Streamable HTTP**, and paste the server URL above. Save, select **Restart** when offered, then **Authenticate**. Complete Visito's browser consent. These are the controls documented by [OpenAI](https://developers.openai.com/codex/mcp); labels can vary by app version.
Alternatively, with the Codex CLI installed, run:
```bash theme={null}
codex mcp add visito --url https://platform-api.visitoai.com/m2m/v1/mcp
```
OAuth sign-in normally opens automatically. If authentication is still required, run:
```bash theme={null}
codex mcp login visito
```
Keep the login command running while you complete the browser flow. After authorizing in Visito, the browser returns to a temporary address on your computer. Wait for Codex to confirm successful authentication, then return to the app and open a new conversation if the tools are not yet available.
```bash theme={null}
codex mcp list
```
This lists the configured server; the identity test below verifies that it can actually access Visito. See [OpenAI's MCP setup documentation](https://developers.openai.com/codex/mcp) for configuration details.
### Ask Claude to help
Paste this into Claude:
```text theme={null}
Help me connect Visito using this remote MCP server:
https://platform-api.visitoai.com/m2m/v1/mcp
Name it Visito. Open the connector setup if you can, or give me the
manual steps. Use OAuth sign-in; do not ask for passwords or API keys in chat.
```
If Visito is already configured, Claude may show a Connect or Reconnect card. A prompt alone does not guarantee installation of a new custom connector. Use the manual setup when needed; a directory result is not proof that Visito has a public store listing.
### Add it manually
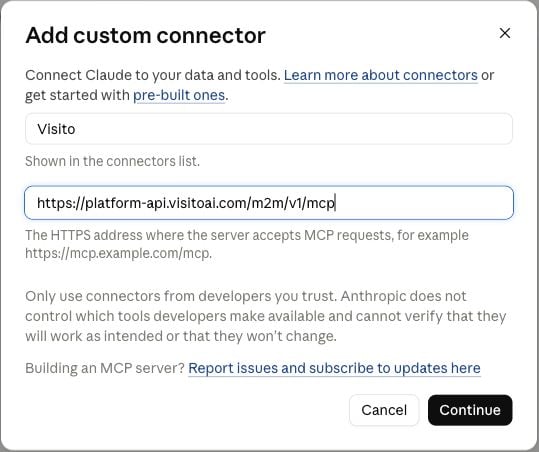
1. Open **Customize → Connectors** in Claude.
2. Open **Add connector** (the **+** menu) and choose **Add custom connector**.
3. Enter **Visito** as the name and the server address above as the remote MCP URL.
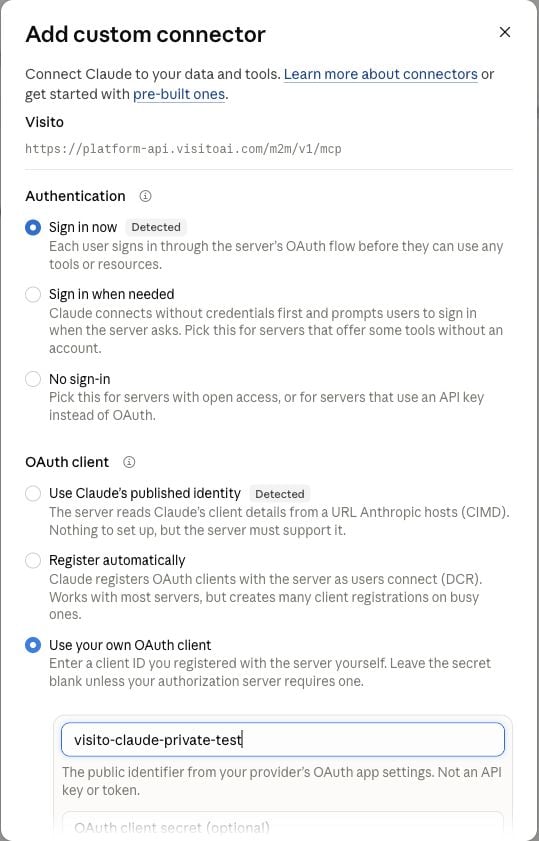
4. Choose **Continue**, then **Sign in now**.
5. Under **OAuth client**, choose **Use your own OAuth client**. Enter `visito-claude-private-test` as the client ID and leave the client secret empty.
6. Choose **Add**, complete the Visito sign-in and permission steps below, then return to Claude.
7. Enable Visito from the conversation's connector controls if it is not already enabled.
The current registered public client ID has the legacy name `visito-claude-private-test`. It identifies the OAuth application; it is not a password, API key, or access token. Your Visito sign-in, chosen business, and granted permissions determine access. Use this predefined-client option: Claude's published-identity and automatic-registration options are not currently registered for this integration.
 Claude Free currently allows one custom connector. If the add option is unavailable, check your plan's limit and workspace policy before removing an existing connector. See [Claude's custom connector instructions](https://support.claude.com/en/articles/11175166-get-started-with-custom-connectors-using-remote-mcp).
## 2. Sign in and choose your business
The connection opens Visito's normal sign-in page. Use your registered administrator account, including Google sign-in if that is how you normally access Visito. After login, you return to **Connect Visito**.
Claude Free currently allows one custom connector. If the add option is unavailable, check your plan's limit and workspace policy before removing an existing connector. See [Claude's custom connector instructions](https://support.claude.com/en/articles/11175166-get-started-with-custom-connectors-using-remote-mcp).
## 2. Sign in and choose your business
The connection opens Visito's normal sign-in page. Use your registered administrator account, including Google sign-in if that is how you normally access Visito. After login, you return to **Connect Visito**.
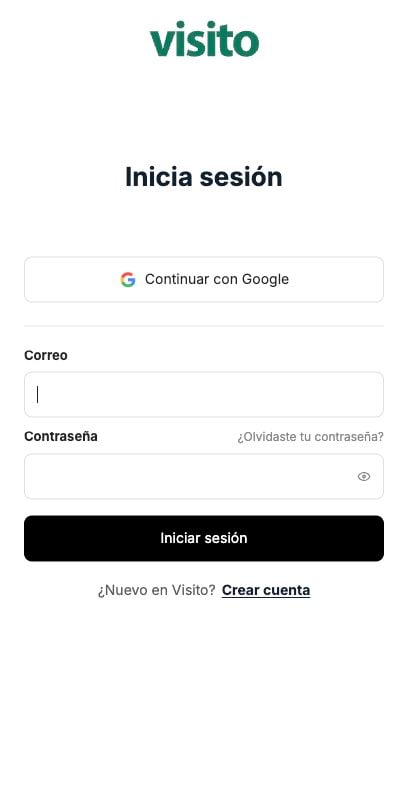 Check the account and business before continuing. Use **Switch account** or **Switch tenant** if needed. Only eligible active businesses where you are an administrator are listed.
Each connection belongs to the business selected here. Changing businesses elsewhere in the Visito dashboard does not change the connection's business. Connect again to authorize a different business.
## 3. Select permissions
Every domain starts with **No access**. Choose only what your assistant needs:
| Selection | What it allows |
| - | - |
| No access | No permissions from that domain. |
| Read | The available read operations for that domain. |
| Read & write | All available read and write actions in that domain, including sending, deletion, automation, or execution where listed. |
| Custom | Only the individual actions you selected under **Customize permissions**. |
Read-only domains offer only No access and Read. **Read all**, **Read & write all**, and **Clear all** apply to the permissions available in the current request. **Limited request** means the assistant requested only part of a domain; expand **Permission details** to see exactly what is available.
Check the account and business before continuing. Use **Switch account** or **Switch tenant** if needed. Only eligible active businesses where you are an administrator are listed.
Each connection belongs to the business selected here. Changing businesses elsewhere in the Visito dashboard does not change the connection's business. Connect again to authorize a different business.
## 3. Select permissions
Every domain starts with **No access**. Choose only what your assistant needs:
| Selection | What it allows |
| - | - |
| No access | No permissions from that domain. |
| Read | The available read operations for that domain. |
| Read & write | All available read and write actions in that domain, including sending, deletion, automation, or execution where listed. |
| Custom | Only the individual actions you selected under **Customize permissions**. |
Read-only domains offer only No access and Read. **Read all**, **Read & write all**, and **Clear all** apply to the permissions available in the current request. **Limited request** means the assistant requested only part of a domain; expand **Permission details** to see exactly what is available.
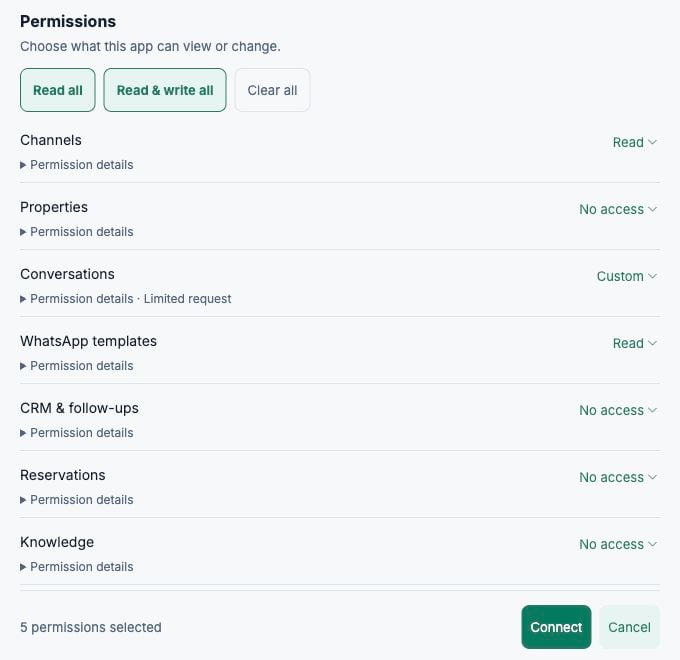 For the examples below, start with these individual permissions in **Customize permissions**:
| Task | Permissions |
| - | - |
| Analyze conversation topics | View connected channels; Read conversations and messages. |
| Send a normal reply and check its result | The above, plus Send replies and attachments; Check message delivery. |
| Inspect approved WhatsApp templates | View WhatsApp templates. This does not grant template sending. |
Keep the other domains at No access. Choose **Connect** when the account, business, and actions are correct. Codex and Claude may separately ask you to approve tool calls; their approval does not add permissions to the Visito connection.
## 4. Run a quick read test
First check the connection:
```text theme={null}
Use Visito to identify the connected account and business. Tell me what the
connection profile actually reports. Do not assume that a profile ID is a
business ID, and do not infer permissions from the list of discovered tools.
Do not change anything.
```
Then try a bounded conversation analysis:
```text theme={null}
Using Visito, review the 20 most recent conversations in the connected business.
Read up to five recent customer messages per conversation. Follow pagination
as needed and count unique conversations. What are the most common topics?
Give counts, the number of conversations successfully reviewed, and any gaps.
Avoid names, phone numbers, and identifying quotes. Do not send messages or
change any conversation. Describe this as a sample, not all account activity.
```
Check that the assistant reads messages instead of guessing from conversation titles. If you request a larger period, ask it to preserve the same filters while following `nextCursor` and check `hasMore`. A first page is not the entire result set, and new activity can affect a live list.
## 5. Send one test reply
Use your own test contact. Replace both placeholders below with a verified name and full international phone number; do not run the prompt with placeholders still present.
```text theme={null}
Find my test contact [CONTACT NAME], phone [INTERNATIONAL PHONE NUMBER],
in Visito. Verify the exact conversation and connected channel. If there are
multiple matches, ask me to choose. Check whether a normal reply is allowed.
If it is allowed, send exactly one message:
"Hello, this is a test of the Visito connection. ✅"
Do not create a new conversation, substitute a template, or send a campaign.
Keep the current AI pause state unchanged if the reply operation supports it.
Use one idempotency key for this logical send, including any safe retry.
Check the message receipt and distinguish queued, sent, delivered, and read.
If sending is not possible, explain the reason without trying another route.
```
A reply is a real customer message. Visito replies can temporarily pause its AI depending on the operation's settings. Inspect the proposed recipient, channel, text, and pause behavior before approving a send.
For WhatsApp, a normal reply depends on the conversation's messaging eligibility. Outside the permitted reply window, an approved template may be needed. Ask the assistant to inspect the channel's available templates, language, approval, and required variables first. Template approval alone does not prove the channel is ready to send. Approve the exact template and recipient before sending, and grant template-send permission only if needed.
A queued or accepted result is not delivery confirmation. Ask for the receipt status; if the provider has not returned a delivery update, the correct result is **delivery pending**. Repeating the request with a new idempotency key can create a duplicate message.
For a campaign, start by asking for a draft audience and template plan. This connection does not expose a dedicated campaign object; do not assume that a request to “send a campaign” creates a managed campaign in Visito.
## 6. Manage or disconnect the connection
1. Open the intended business in the [Visito dashboard](https://dashboard.visitoai.com).
2. Open **Developers → API keys & apps**. In Spanish: **Desarrolladores → Claves API y apps**.
3. Set the access-type filter to **Connected applications** / **Aplicaciones conectadas**.
4. Open **View permissions** / **Ver permisos** on your connection to inspect its domains, creator, and activity.
5. To revoke access, choose **Disconnect application** / **Desconectar aplicación** and confirm the intended connection.
For the examples below, start with these individual permissions in **Customize permissions**:
| Task | Permissions |
| - | - |
| Analyze conversation topics | View connected channels; Read conversations and messages. |
| Send a normal reply and check its result | The above, plus Send replies and attachments; Check message delivery. |
| Inspect approved WhatsApp templates | View WhatsApp templates. This does not grant template sending. |
Keep the other domains at No access. Choose **Connect** when the account, business, and actions are correct. Codex and Claude may separately ask you to approve tool calls; their approval does not add permissions to the Visito connection.
## 4. Run a quick read test
First check the connection:
```text theme={null}
Use Visito to identify the connected account and business. Tell me what the
connection profile actually reports. Do not assume that a profile ID is a
business ID, and do not infer permissions from the list of discovered tools.
Do not change anything.
```
Then try a bounded conversation analysis:
```text theme={null}
Using Visito, review the 20 most recent conversations in the connected business.
Read up to five recent customer messages per conversation. Follow pagination
as needed and count unique conversations. What are the most common topics?
Give counts, the number of conversations successfully reviewed, and any gaps.
Avoid names, phone numbers, and identifying quotes. Do not send messages or
change any conversation. Describe this as a sample, not all account activity.
```
Check that the assistant reads messages instead of guessing from conversation titles. If you request a larger period, ask it to preserve the same filters while following `nextCursor` and check `hasMore`. A first page is not the entire result set, and new activity can affect a live list.
## 5. Send one test reply
Use your own test contact. Replace both placeholders below with a verified name and full international phone number; do not run the prompt with placeholders still present.
```text theme={null}
Find my test contact [CONTACT NAME], phone [INTERNATIONAL PHONE NUMBER],
in Visito. Verify the exact conversation and connected channel. If there are
multiple matches, ask me to choose. Check whether a normal reply is allowed.
If it is allowed, send exactly one message:
"Hello, this is a test of the Visito connection. ✅"
Do not create a new conversation, substitute a template, or send a campaign.
Keep the current AI pause state unchanged if the reply operation supports it.
Use one idempotency key for this logical send, including any safe retry.
Check the message receipt and distinguish queued, sent, delivered, and read.
If sending is not possible, explain the reason without trying another route.
```
A reply is a real customer message. Visito replies can temporarily pause its AI depending on the operation's settings. Inspect the proposed recipient, channel, text, and pause behavior before approving a send.
For WhatsApp, a normal reply depends on the conversation's messaging eligibility. Outside the permitted reply window, an approved template may be needed. Ask the assistant to inspect the channel's available templates, language, approval, and required variables first. Template approval alone does not prove the channel is ready to send. Approve the exact template and recipient before sending, and grant template-send permission only if needed.
A queued or accepted result is not delivery confirmation. Ask for the receipt status; if the provider has not returned a delivery update, the correct result is **delivery pending**. Repeating the request with a new idempotency key can create a duplicate message.
For a campaign, start by asking for a draft audience and template plan. This connection does not expose a dedicated campaign object; do not assume that a request to “send a campaign” creates a managed campaign in Visito.
## 6. Manage or disconnect the connection
1. Open the intended business in the [Visito dashboard](https://dashboard.visitoai.com).
2. Open **Developers → API keys & apps**. In Spanish: **Desarrolladores → Claves API y apps**.
3. Set the access-type filter to **Connected applications** / **Aplicaciones conectadas**.
4. Open **View permissions** / **Ver permisos** on your connection to inspect its domains, creator, and activity.
5. To revoke access, choose **Disconnect application** / **Desconectar aplicación** and confirm the intended connection.
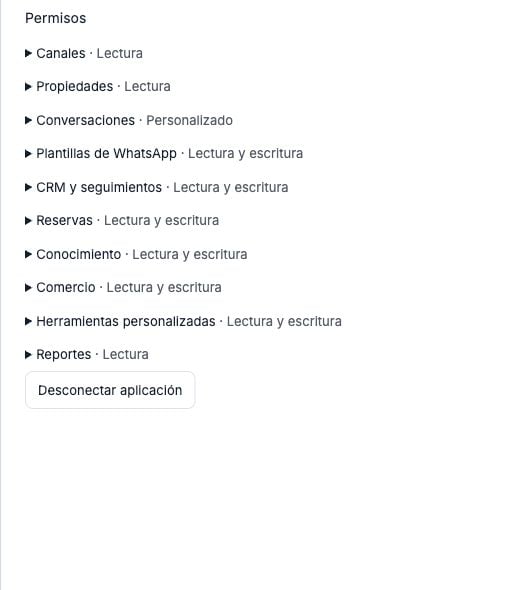 Disconnecting one grant leaves other connections active. If the disconnect action is unavailable, ask the connection owner or an eligible administrator to review it. To change granted permissions, disconnect and reconnect with the desired selection.
Remove the connector from Claude or the MCP configuration from Codex if you also want to remove it from that assistant. For Codex:
```bash theme={null}
codex mcp logout visito
codex mcp remove visito
```
Revoking Visito access prevents new authenticated operations; it does not erase information already copied into an assistant conversation.
## Troubleshooting
| What you see | What to do |
| - | - |
| An active administrator account is required | Switch to your registered Visito administrator account and check the selected business. |
| Insufficient permission or scope | Inspect the connection in Visito, then reconnect with the specific missing action. Discovering a tool does not authorize its use. |
| Codex returns to `127.0.0.1` and the connection is refused | Start a fresh `codex mcp login visito` and keep it running until completion. An old consent tab may point to an expired local callback listener. |
| Chrome shows `ERR_BLOCKED_BY_CLIENT` | Have the browser owner review the blocking extension or managed-browser policy. Restart the sign-in flow after the block is resolved. |
| Authentication complete, but the browser page looks plain | This final local callback page belongs to the assistant. Return to Codex and verify the connection with a read test. |
| Claude cannot add another custom connector | Check the plan's connector limit or the workspace owner's policy. |
| Unrecognized OAuth client in Claude | Choose Use your own OAuth client and enter the exact public client ID above. Leave the secret empty; contact Visito support if it is still rejected. |
| Wrong business in the result | Stop before writing, disconnect the incorrect grant, and reconnect with the intended business. |
For developers, see the [API documentation](/api-docs/introduction). Visito enforces business isolation and the connection's granted scopes on each operation.
Disconnecting one grant leaves other connections active. If the disconnect action is unavailable, ask the connection owner or an eligible administrator to review it. To change granted permissions, disconnect and reconnect with the desired selection.
Remove the connector from Claude or the MCP configuration from Codex if you also want to remove it from that assistant. For Codex:
```bash theme={null}
codex mcp logout visito
codex mcp remove visito
```
Revoking Visito access prevents new authenticated operations; it does not erase information already copied into an assistant conversation.
## Troubleshooting
| What you see | What to do |
| - | - |
| An active administrator account is required | Switch to your registered Visito administrator account and check the selected business. |
| Insufficient permission or scope | Inspect the connection in Visito, then reconnect with the specific missing action. Discovering a tool does not authorize its use. |
| Codex returns to `127.0.0.1` and the connection is refused | Start a fresh `codex mcp login visito` and keep it running until completion. An old consent tab may point to an expired local callback listener. |
| Chrome shows `ERR_BLOCKED_BY_CLIENT` | Have the browser owner review the blocking extension or managed-browser policy. Restart the sign-in flow after the block is resolved. |
| Authentication complete, but the browser page looks plain | This final local callback page belongs to the assistant. Return to Codex and verify the connection with a read test. |
| Claude cannot add another custom connector | Check the plan's connector limit or the workspace owner's policy. |
| Unrecognized OAuth client in Claude | Choose Use your own OAuth client and enter the exact public client ID above. Leave the secret empty; contact Visito support if it is still rejected. |
| Wrong business in the result | Stop before writing, disconnect the incorrect grant, and reconnect with the intended business. |
For developers, see the [API documentation](/api-docs/introduction). Visito enforces business isolation and the connection's granted scopes on each operation.